


Your sign is often the first encounter a potential customer has with your brand. But when a customer has an inconsistent brand experience across different locations, that can signal a brand that, at the very least, doesn’t care about it’s own image or, at worst, doesn’t care about the customer. Consistent branding across all locations is a critical aspect to communicating brand values and, ultimately, winning over the customer.
Coordinating signage across multiple locations can be complex, but it’s essential for maintaining brand consistency, complying with local regulations, and ensuring smooth operations. Here’s what you need to know:
- Why It Matters: Consistent signage builds trust and recognition. Centralized coordination also simplifies budgets, reduces costs, and avoids errors.
- Key Challenges: Variations in local regulations, inconsistent branding, and logistical hurdles like permits and installation delays.
- Solutions:
- Create detailed brand guidelines for colors, fonts, and materials.
- Conduct thorough site surveys to identify municiple and location-specific requirements.
- Use phased rollouts to test and refine processes.
- Appoint a dedicated project manager and collaborate with experienced teams.
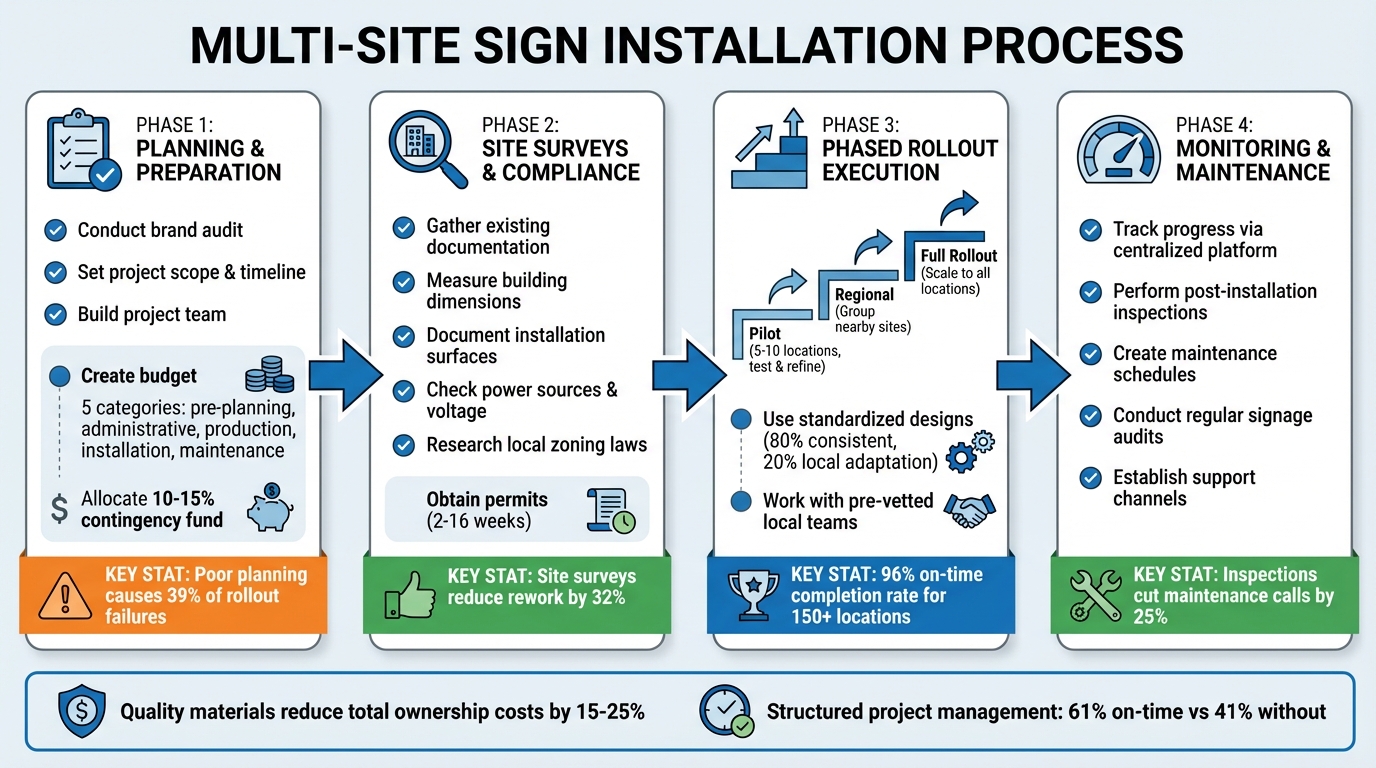
Multi-Site Sign Installation Process: 4 Key Phases for Successful Rollout
Planning and Preparing for Multi-Site Installations
Careful planning is what makes the difference between a smooth multi-site rollout and a chaotic mess. Before you even think about fabrication, you need a clear multi-site strategy that covers brand consistency, regulatory requirements, and scalable deployment plans. Getting this foundation right helps avoid the pitfalls of inconsistent branding and spiraling costs. Here’s a closer look at how to define the project scope, build a strong team, and allocate your budget effectively.
Setting Project Scope and Timeline
Brands that have smooth rollouts generally follow these steps:
- Start by gathering all the critical details for each site, including addresses, floor plans, elevations, and landlord contacts. This groundwork helps you sidestep surprises down the road.
- Conduct a brand audit to identify any existing signage inconsistencies across your locations, and then create standardized templates to align everything. This step not only ensures consistency but also keeps you on the right side of regulatory requirements.
- Once you’ve mapped out all your locations, organize them into regional groups and prioritize based on business needs. This approach helps create a logical rollout sequence. For example, flagship and high-traffic locations should recieve priority.
- To stay on track, use reverse scheduling: work backward from your target completion date to set realistic milestones for design, permitting, and fabrication. Also, consider using high-quality materials upfront; while they may cost more initially, they can reduce total ownership costs by 15% to 25% thanks to longer lifespans and lower maintenance needs.
- Consider if temporary signage can help idenitify a location for a short period before permanent signage can be installed.
Building Your Project Team and Engaging Stakeholders
For a project of this scale, appointing a dedicated project manager is key. This person will act as the central point of contact, ensuring everything runs smoothly.
If you aren’t working with a national sign company or are trying to coordinate projects across multiple signage partners, an internal team managing onboarding vendors, multi-jurisdictional compliance, and other moving project parts can streamline the process.
A best practice when entering a multi-site rollout is to start with a pilot phase involving 5–10 locations. This allows you to test your processes and refine installation instructions before scaling up. A phased approach helps improve consistency, minimize rework (and associated costs), and protect timelines across multi-site deployments.
Creating Budgets and Allocating Resources
Budgeting for multi-site installations requires accounting for a wide range of site-specific factors. For example, wall construction materials (brick vs. metal studs), power availability, and equipment access (cranes or bucket trucks) can all significantly affect costs. Permitting fees also vary greatly by location; some cities require detailed electrical plans and wind load calculations, while others have simpler requirements.
Break your budget into five key categories:
- Pre-planning: Includes site surveys, code checks, and engineering reviews.
- Administrative fees: Covers permits and landlord approvals.
- Production: Accounts for materials and UL certification.
- Installation: Includes equipment, labor, and travel costs.
- Maintenance: Ensures long-term functionality.
Don’t forget to include a contingency fund for unexpected challenges.
Research from ElectroiQ shows that 39% of projects fail because of insufficient or poor planning.
Completing full site surveys before fabrication can significantly cut rework, making this a worthwhile investment. A well-structured budget not only keeps your project on track but also helps maintain consistent branding across all locations.
sbb-itb-d3f8bfa
Site Surveys and Local Regulations
Getting accurate site data upfront can save you from costly delays. Skipping thorough site surveys or misjudging local regulations often leads to setbacks. Before you even think about fabricating a sign, make sure a team is on-site to assess all the specific conditions.
Conducting Site Surveys
Partnering with a signage vendor can streamline the whole survey process. A sufficient site survey should do the following:
- Start by gathering any existing documentation, such as lease agreements, tenant handbooks, building blueprints, or past signage permits. This prep work will save you time when the surveyor is on-site.
- Once there, the surveyor should measure everything – building frontage, mounting areas, and vertical clearances – to ensure your design aligns with local size and height restrictions.
- Don’t forget to document the installation surface material (like brick, metal studs, or concrete) and confirm its weight-bearing capacity. This info is critical for structural engineering and estimating installation costs.
- For illuminated signs, check where the power source is located, confirm the available voltage, and figure out if trenching for new electrical runs will be necessary.
- Take photos of sightlines from different distances to identify potential obstructions – trees, utility poles, or nearby signs. A
- Map out property lines, setbacks, and utility easements to steer clear of encroachment violations.
Once you’ve collected all the data, the next task is understanding how local zoning laws might affect your plans.
Understanding Zoning Laws and Permits
The data from your survey becomes essential when navigating local codes. Signage regulations operate on several levels: federal (like the Highway Beautification Act), state and local (zoning rules, size and height limits, illumination brightness restrictions), and product safety standards (such as NEC Article 600 and UL requirements). These rules often change by zoning district. For example, residential zones may ban illuminated signs entirely, while commercial zones are typically more flexible. Some codes even tie signage size to building frontage, such as allowing one square foot of signage per linear foot of building width.
Regional differences add another layer of complexity:
- East Coast cities might enforce strict historical preservation rules.
- West Coast areas could focus on issues like LED brightness and dark-sky compliance.
- Southern states, on the other hand, often prioritize wind-load and hurricane safety.
- Permit approval timelines vary too – ranging from 2 to 6 weeks in most cases, but stretching to 16 weeks in complicated jurisdictions like New York City. For national rollouts, it’s smart to budget 60–90 days for the permitting phase to handle stricter jurisdictions.
Always get landlord or property manager approval before submitting any permit applications, as their requirements can be stricter than municipal codes. A trusted sign vendor can help in researching local ordinances during the design phase to help avoid costly revisions later on.
Recording Site-Specific Information
Centralizing all your findings ensures consistency from the design phase through installation. Create a database that includes everything – photos, measurements, compliance notes, and regulatory requirements. This database should act as your blueprint for fabrication and installation. Key details to include are:
- Structural information: surface materials, mounting height, and wind-load requirements.
- Electrical specs: power source location, voltage, and brightness levels (measured in nits).
- Zoning data: setbacks, property lines, and whether the site falls within a historic district.
- Visibility factors: traffic flow and sightline obstructions.
Keep copies of all approved permits and scaled drawings at the site. If a code enforcement officer raises an issue, these documents can serve as your defense. By centralizing everything – photos, permits, measurements, and drawings – in a shared database, you ensure that everyone, from designers to installers, is working with the same accurate information. It’s also a good idea to set aside a 10–15% contingency fund to handle any unexpected site-specific challenges. This approach keeps the entire process as smooth as possible.
Executing Multi-Site Installations
Once surveys are complete and permits are in hand, it’s time to bring your rollout plan to life. Breaking the process into smaller, manageable stages is key to keeping quality consistent across every location.
Using Phased Rollout Strategies
A phased approach builds on careful planning and site surveys, ensuring installations go smoothly. Instead of tackling all locations at once, divide the rollout into three stages: a pilot phase, a regional phase, and finally, a full rollout.
- Pilot Phase: Start with 5–10 locations to test your process. This allows you to identify and resolve issues, like hardware mismatches or unexpected electrical challenges.
- Regional Phase: Group nearby locations together to streamline travel and permitting. Neighboring jurisdictions often share similar regulations, making this step more efficient.
- Full Rollout Phase: With a refined playbook from earlier phases, you can confidently scale up to all remaining locations.
Using a phased strategy has clear benefits. For example, organizations that use structured project management tools complete 61% of their projects on time, compared to just 41% for those that don’t. Plus, grouping sites by region allows you to reuse trained teams who are already familiar with your brand standards, saving time and ensuring consistency.
Working With Local Installation Teams
Local installation teams play a direct role in how your brand is presented. To avoid delays and inconsistent results, work with a pre-vetted network of licensed technicians who meet OSHA standards and hold the necessary regional licenses and bonds.
To keep installations on track, brands should:
- Confirm site access with landlords or store managers 24 to 48 hours before the scheduled work.
- Schedule installations during off-hours – early mornings, evenings, or overnight – to minimize disruptions to business operations.
- PRO TIP: Require “before and after” photos, and nighttime photos, to document each installation. This simple step can significantly reduce reactive maintenance needs.
Standardizing Designs and Specifications
Site surveys often uncover potential discrepancies, so standardizing your design elements is essential. Create a flexible design template that keeps the majority of the branding consistent while still allowing for some flexibility to meet local codes. Many brands find that developing a brand signage standard guide can help codify PMS color codes, typography, logo placement, and approved mounting hardware.
Centralizing fabrication with a single sign company ensures consistent quality before shipping the signs to local installers. This approach guarantees uniformity across all locations, even when mounting conditions vary. Additionally, investing in high-quality materials and fabrication methods can lower the total cost of ownership, thanks to longer service life.
Monitoring and Post-Installation Support
Installing signs is just the beginning. The bigger challenge comes with keeping track of the progress, ensuring quality, and maintaining performance across all locations over time.
1. Tracking Installation Progress
When managing signage projects across multiple sites, having real-time updates is essential. A centralized management platform can simplify this process, providing updates at every stage – from submitting permits and tracking fabrication to reviewing final installation photos.
Assigning a single project manager, or a team of project managers depending on the scope of the program, to oversee logistics and communicate with vendors can prevent delays. This person ensures that approvals, artwork revisions, and scheduling stay on track, eliminating the need for constant manual follow-ups. Automated tools can further help by sending notifications when specific actions are required, reducing the risk of bottlenecks that could slow down the project.
Once progress is tracked, the next step is to verify the quality of the installed signs through formal inspections.
2. Performing Post-Installation Inspections
Thorough post-installation inspections can cut down on future maintenance calls. Use a detailed checklist to confirm that the signage aligns with approved designs, functions properly – especially for illuminated or digital signs – and adheres to safety standards. Don’t forget to check compliance with local building codes and ADA requirements. Any issues should be documented in a punch list and resolved quickly.
After inspections, focus on creating a robust maintenance plan to ensure the signs remain in top condition.
3. Setting Up Maintenance and Support Plans
Regular maintenance is vital to maintaining brand consistency and ensuring that signage functions correctly across all locations. Start by conducting a signage audit at each site, noting details like sign type, age, recurring problems, and warranty coverage. This helps identify immediate needs and potential cost-saving opportunities.
Some locations will need more frequent attention depending on their environment. For example, high-traffic areas or regions with harsh weather – like heavy snow, high volumes of direct sunlight, or hurricane zones – may require extra inspections.
Divide your maintenance budget into key areas: routine inspections (includign nighttime photo surveys), repairs, cleaning, emergency funds, and digital upgrades. Establish clear communication channels so site managers know exactly who to contact for support. Additionally, reviewing the budget quarterly or annually allows for adjustments as your business grows or conditions change.
For businesses managing multiple locations, working with a partner like North American Signs can simplify the process. They offer a reliable network to handle maintenance and ensure consistent quality and quick response times.
Conclusion and Key Takeaways
Review of Best Practices
Handling multi-site sign installations requires meticulous planning and execution. Start by conducting a detailed needs assessment to identify all locations, set budgets, and establish a reverse schedule to meet deadlines comfortably. It’s also essential to perform technical field surveys and research local codes for every site to ensure compliance with municipal regulations and to address any unique conditions.
Consistency is key when it comes to branding. Create a brand signage standard guide) that clearly outlines brand specifications like Pantone colors and typography to ensure uniformity across locations. While standardization is vital, allow room for local adaptations, but centralize approvals to maintain brand integrity.
For larger projects, implement a phased rollout strategy. Start with high-visibility or flagship locations to identify and address potential issues during initial installations before moving on to other sites. Having a single point of contact simplifies logistics and ensures accountability throughout the process. Additionally, coordination doesn’t end with installation – final inspections, permit closures, and long-term maintenance planning are equally important.
By adopting these practices, you ensure a smoother process, consistent branding, and efficient execution, especially when working with a seasoned signage partner. For end-to-end project management, our team here at North American Signs offer solutions that handle everything from fabrication to local installation, simplifying the process for national rollouts.
Benefits of Working With an Experienced Signage Partner
Relying on multiple vendors often leads to communication breakdowns and delays. A full-service signage partner eliminates these challenges by offering single-source accountability – one point of contact, one project manager for all locations, and simplified invoicing.
With over 90 years of experience and a network of more than 3,500 trusted partners across the country, North American Signs delivers high-quality results for multi-site projects. Their extensive network combines local expertise with national standards, handling everything from site surveys and landlord approvals to fabrication, logistics, installation, and ongoing maintenance. As North American Signs puts it:
“We anticipate and solve problems before they happen”
This proactive approach is exactly what’s needed to manage signage across dozens – or even hundreds – of locations effectively.
FAQs
What should a multi-site sign project manager own?
A multi-site sign project manager is responsible for handling every part of a signage program, from initial design to installation and sometimes ongoing maintenance. Their role involves juggling several key tasks, such as organizing logistics, securing necessary permits, and ensuring all work complies with regulations. They also manage budgets, keep projects on schedule, and maintain consistent branding across all locations.
Additionally, they serve as a point of contact for stakeholders, keeping everyone informed and aligned. Managing vendor relationships is another critical part of the job, ensuring smooth operations across various locations while navigating the unique challenges that come with working in different areas and environments.
How can I avoid permit delays across multiple cities?
To keep permit delays at bay, take the time to thoroughly understand each city’s zoning laws, codes, and restrictions. Ensure your permit packages are accurate and complete, including essentials like site plans, structural calculations, and contractor information. Building strong connections with local officials or partnering with a code check company can also make the process smoother. Using a centralized tracking system is another smart move – it helps you stay on top of deadlines and submissions, maintaining consistency and minimizing errors across multiple locations.
What site survey details matter most before fabrication?
Key details for a site survey include precise measurements, the condition of existing signage, any site-specific limitations, and compliance with local regulations. These elements are essential for ensuring accurate fabrication, safe installation, and meeting all necessary codes. By thoroughly assessing the site, potential challenges can be spotted early, helping to keep the process smooth and prevent unnecessary delays.
0 Comments